Hardly a week goes past without someone posting a frantic message along the following lines: “AHH!! My hard drive just crashed and I lost all of my photographs.” More than heartbreaking, such loss is devastating. Make sure this does not happen to you! Read on to learn the simple steps (officially called workflow) which will help you to backup your images and avoid this mistake.
1. Buy two external hard drives. Go for one TB minimum as photographs take up lots of space. NewEgg and Small Dog Electronics generally have great prices. Make sure you buy the one that matches your computer: PC vs Mac and firewire vs USB. Follow the instructions to sync this to your computer.
2. Every time you download images, direct the import to your designated hard drive. You should also be able to simultaneously backup the import to another source. Choose your other external hard drive for this. Label the drives clearly.
3. If you take lots of photographs, consider buying Adobe’s Lightroom. It’s easy and intuitive to use (unlike Photoshop). Though it might seem outrageous to spend $139 on this, trust me, you won’t regret it. The link above will give you the option of trying it for 30 days.
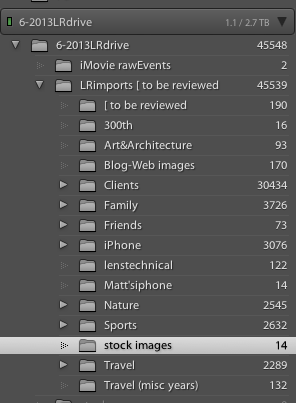
4. Make an obvious system for labeling your images when you import them. I typically start a new hard drive each year, which I realize most of you won’t need to do. I divide the year into categories: Clients, Family, Stock, Travel, etc., and then subdivide these categories. An incoming photo will have a title such as FamChristmas14. When I import, I direct the program to place my images in the appropriate category. The more specific you are, the easier it is to find your photographs. Here’s a screenshot of my categories in Lightroom.
5. Every so often, make a folder on your desktop with your absolutely favorite files and then burn those files, as large as possible, onto an archival disk. You will now have your photographs in three places.
That’s it! When—because for most of us it’s inevitable that our hard drives will crash, that happens—you will at least have the solace of knowing that your images are safe.
If this process seems overwhelming, buy the external hard drive, put your images in specific folders on your desktop, and then simply drag your images into labeled folders on the external. This is a less efficient system but at least your photos will exist in two places. (You can also choose to backup images on the Cloud. I am still wary of this for many reasons.)
Questions? Email me or leave a message in the comment section and I’ll try to answer it for you. PLEASE take the time to start this process if you have not already.
You can also read the following articles for more information:
Back Up Your Digital Photos/About Tech
Backing Up Digital Photos/The Guardian

